
Admin Managers' Guide: Set Up Phish Reporter in Microsoft Outlook 365

This guide shows you how to configure Microsoft 365’s built-in Report Phishing capability so that learners can report all suspicious emails to your internal reporting mailbox and to the platform with a single click.
In This Guide:
Step 1: Create a Shared Mailbox for Reported Emails
Step 2: Configure Microsoft Defender "User Reported Settings"
Step 3: Install the Report Phishing Add-In (Optional)
Step 4: Forwarding to Goldphish (Mail Flow Rule)
Step 6: Staff Communication Template
Step 1: Create a Shared Mailbox for Reported Emails
The shared mailbox stores all internally reported messages for your team to review.
- Sign in to the Microsoft 365 Admin Center > Teams & groups > Shared mailboxes. (Click Show all in the left menu if you don't see Teams & Groups).
- Select + Add a shared mailbox.
- Enter a name for the mailbox:
- Display Name: (e.g. PhishReport)
- Email address: (e.g. phishreport@yourdomain.com )
- Click Save changes.
- Under Next steps, click Add members to this mailbox to grant Read and Manage (Full Access) permissions to your IT/Security team.
Note: Shared mailboxes do not require a Microsoft licence. It may take 5–10 minutes before the new mailbox appears as selectable in Microsoft Defender.
Microsoft updates their UI frequently. If menus look different, refer to Microsoft’s “About Shared Mailboxes” page. Microsoft 365 About Shared Mailboxes
Step 2: Configure Microsoft Defender " User Reported Settings"
This step tells Microsoft what to do when a user clicks the Report Phishing button in Outlook.
- Go to the Microsoft Defender Security Portal > Settings > Email & collaboration > User reported settings (https://security.microsoft.com/securitysettings/userSubmission).
- Under Outlook:
- Tick Monitor reported messages in Outlook.
- Under Select an Outlook report button configuration, select Use the built-in Report button in Outlook.
- Under When a user reports an email, tick both:
- Ask the user to confirm before reporting
- Show a success message after the message is reported
- Under the Reported message destination section, configure the following options:
- Send reported messages to: Select My reporting mailbox only *(This ensures that reported Goldphish simulated emails go directly to your internal shared mailbox and are not sent to Microsoft as real spam).
- Add an Exchange Online mailbox to send reported messages to: Enter your newly created shared mailbox address (e.g. phishreport@yourdomain.com ).
- Under Email notifications: Leave all checkboxes unticked.
- Under Reporting from quarantine: Tick Allow reporting for quarantined messages.
- Click Save.
Step 3: Install the Report Phishing Add-In ( Optional)
Note: This legacy add-in is deprecated. The built-in Outlook Report button configured in Step 2 is recommended for all modern Outlook clients.
- Go toMicrosoft AppSource> Search for Report Phishing.
- Click Get it now.
- Follow the on-screen instructions to complete installation.
Step 4: Forwarding to Goldphish ( Mail Flow Rule)
This step ensures Goldphish receives report metrics so they display on your Admin Dashboard.
- Open the Exchange Admin Center > Mail flow > Rules.
- Click Add a rule > Create a new rule.
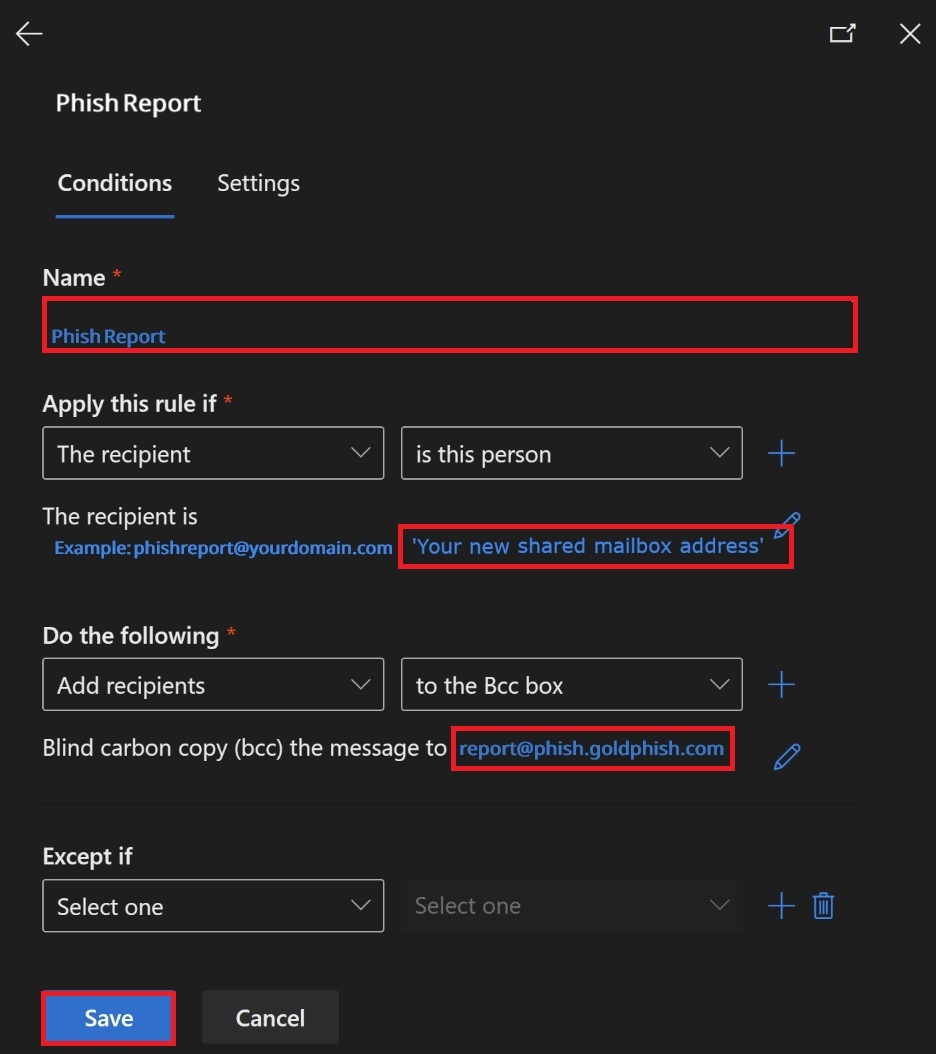
- Set the rule Name: Phish Report.
- Under Apply this rule if, select The recipient is → is this person → choose your newly created shared mailbox (e.g.phishreport@yourdomain.com ).
- Under Do the following, select Add recipients → to the Bcc box → enter report@phish.goldphish.com.
- Ensure the rule status is set to Enforce and click Save.
*Every reported email will now land in your internal shared mailbox and automatically send a copy to Goldphish for dashboard tracking.
Step 5: Test the Setup
To confirm everything is configured correctly, run a quick test simulation:
- Launch a Test: Create a quick phishing simulation targeting 2 or 3 internal team members.
- Perform Actions: Ask the test users to open the email and click the Report Phishing button in Outlook.
- Verify Dashboard Metrics: Go to Phishing > select your Test Simulation to confirm that the Reported percentage and Reported status indicator have updated on your Simulation Overview page.

Note: Reported emails may take 5–10 minutes to appear in your dashboard.
Troubleshooting Email Delivery: If team members don't receive the test simulation email in their inbox, please ask them to check their spam/junk folder.
If it still hasn’t arrived, your IT team may need to double-check your whitelisting setup to ensure Goldphish domains are whitelisted across all security layers and tools. This includes bypassing Anti-Spam, Anti-Virus, Malware Scanning, Link Rewriting/Sandboxing, and URL Defence tools.
For more information, visit our guides:
Step 6: Staff Communication Template
Copy and send this template to your team to introduce the new reporting button:
Subject: Action Needed: How to report suspicious emails in Outlook
Hi team,
We've made it quick and easy to report suspicious emails!
If you receive an email that looks suspicious or out of the ordinary:
- Open the email and click the Report Phishing button in Outlook (desktop, web, or mobile).
- Click Confirm when prompted.
Everything you report goes straight to our internal security team and helps keep our organisation safe.
- In Outlook Desktop: Look for the Report Phishing button in the main top toolbar.
- In Outlook Web / Mobile: Look for the Report Phishing button in the email options menu.
✔ Please report anything suspicious - even if you aren’t 100% sure.
⛔ Never click links or open attachments in suspicious emails.
Thanks for helping keep our organisation secure!
Best regards,
IT & Security Team
If you ever get stuck at any point, click the in-app chatbot icon in the bottom-right corner to chat to our support team or drop us an email via support - we're happy to help! 😊