
Partners' Guide: White-Labelling the Platform
White-labelling allows you to proudly display your brand (or your client’s brand) across the entire platform experience. Whether you're delivering a fully managed service or a co-branded solution, here is how you manage the visual identity of the platform for your partner account and customer base.
Need help with white-labelling at an individual customer level? See our Admin Managers' Guide: White-Labelling the Platform guide.
Watch our Video Tutorial:
Customise Branding & Theme
Match the platform to your brand identity in seconds:
- Sign in to your Partner Dashboard.
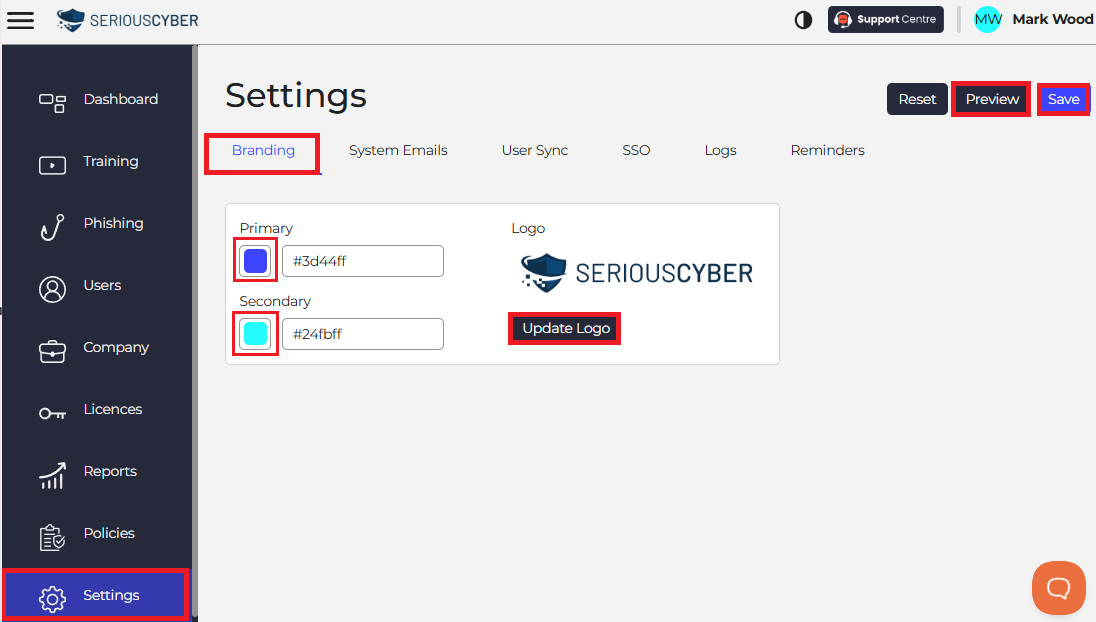
- Navigate to Settings > Branding
Setting Brand Colours:
- Primary & Secondary Colours: Enter your hex colour codes (e.g., #3d4aff or #27ff24) or click the colour box to pick your exact brand shades.
Adding Your Logo:
- Under the Logo section, click Update Logo.
- Click Choose File to upload your image.
- Suggested Size: Max size of 760px width × 120px height.
- Use the Crop Image handles or the zoom icons (+ / -) in the top right corner to fine-tune the crop.
- Keep an eye on the Preview box to make sure it looks pixel-perfect, then click Save.
Tip: Use a PNG file with a transparent background so your logo blends seamlessly into both light and dark header themes!
Preview & Save Your Branding:
- Test the Look: Click the Preview button in the top right corner of the dashboard to see how your new colours and logo look live across the platform and customer accounts.
- Save Changes: Click Save in the top right corner to publish your branding
Note: Once white-labelling is saved, your branding will automatically default across all your customer accounts (or sub-partner accounts at the Distributor level).
System Emails
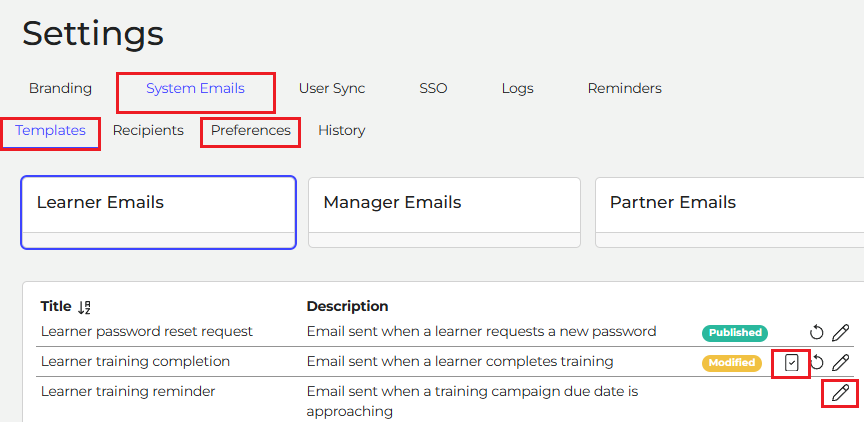
Navigate to Settings > System Emails to edit automated emails sent across your accounts.
System Email Templates
- Under the Templates tab, you can view and edit emails grouped by recipient type (Learner Emails, Manager Emails, and Partner Emails).
- Browse Templates: Scroll through the list of automated emails
- Edit Template: Click the pencil icon on the right side of any template row to edit the email.
Template Status Labels:
- Modified (Yellow): You’ve made changes, but they aren't live yet. Click the square checkmark icon next to the pencil to publish your updates.
- Published (Green): This version is live and actively being sent to your internal team and across all customer accounts.
System Preferences & Contacts
- Switch to the Preferences tab to update your partner point-of-contact details.
Tip: Setting up your internal support email ensures customers and users know who to reach out to if they need help or have questions.
Note: Any system email templates you edit and publish at Partner level will automatically become available across all your customer accounts (or sub-partner accounts at the Distributor level).
Customise Phishing Simulation Templates
Go to Phishing > Templates.
You can duplicate existing templates or create new templates from scratch to make simulations more realistic, localised, and relevant to your team and customers.
Ways to Manage Templates:
- Create From Scratch: Click the Create A Template button in the top right corner to build a completely custom email template.
- Duplicate Existing Templates: Click the three dots(...) at the bottom of any template card and select Duplicate Template to use it as a starting point.
- Save Favourites: Click the heart icon on any card to add it to your Favourites tab for fast access during simulation setup.
- Filter & Search: Easily browse through All, My Templates, or Favourites, or use the dropdown filters to sort by Language, Name, Type, Topic, or Status.
Publishing & Partner Distribution
Note:
- Remember to publish your template. Once published (Green), your custom template will be available to select when creating a simulation
- Any templates you publish at the Partner level will automatically become available across all your customer accounts (or sub-partner accounts at the Distributor level).
Need help? See our Customise Phishing Templates guide
If you run into any questions or need advice on partner configuration, just pop us a message via the in-app chatbot or drop us an email via support. We’re happy to help! 😊