
Quick Start Guide: Welcome to Your Security Awareness Platform 👋

Follow these onboarding steps in order, and you’ll have your programme live in no time!
In This Guide:
- Step 1. Watch the Platform Walkthrough Video
- Step 2. Log In & Access the Platform
- Step 3. Add Your Users & Allocate Licences
- Step 4. Configure Your Settings & Branding
- Step 5. Complete the Technical Setup
- Step 6. Run a Quick Test Simulation
- Step 7. Launch Your Baseline & First Training Session or Series
- Step 8. Access Your Reports
- Bonus. Grab Your Free Resources
Step 1. Platform Walkthrough Video
Before diving in, take a few minutes to watch our onboarding video for a quick overview of the platform!
Step 2. Log In & Access the Platform
Check Your Inbox: Sign in using the link in your Manager Welcome Email. If you haven't received your welcome email, please check your spam/junk folder.
Trouble signing in? If you run into access issues, go directly to app.goldphish.com
or follow our steps in the How to reset your password guide.
Step 3. Adding Users & Allocating Licences
Heads-up: Your team won’t receive any automated emails until you officially launch your first training session or series. This gives you and your IT team plenty of time to get things configured and tested without any pressure!
Adding Your Users
Choose whichever method fits your organisation best. You can upload as many users as your current licence count allows. As you add new people, your available licences will automatically be allocated to them.
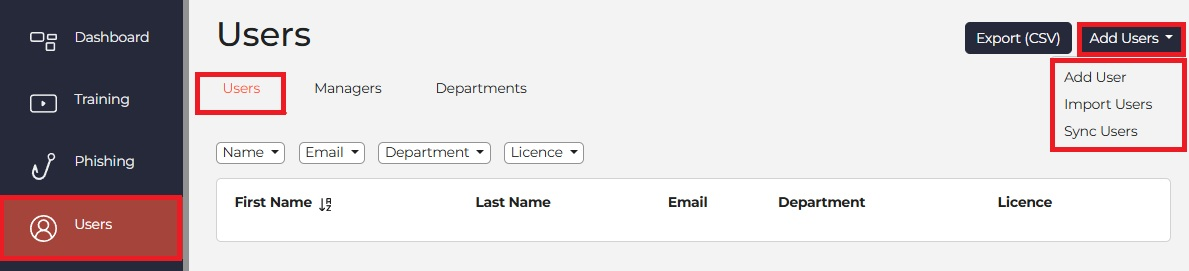
- Go to Users > Add Users.
- Select your preferred method:
- Manually: Add users one by one (great for small teams).
- Bulk Import: Upload everyone at once using a CSV file.
- Sync: Set up our Active Directory Integration to handle it automatically.
Need a top-up? Check out our How to Order & Allocate Licences guide.
Need more info? Check out our How to Add Managers and How to Create and Manage Departments guides.
Upgrading From a Trial?
If you've recently upgraded, your trial licences have automatically expired. Let's get those users moved over to your new Premium licences:
- Navigate to the Licence section.
- Click the Expired Licences tab.
- Select specific learners or click Select All.
- Click Allocate Licences - and you're good to go!
Step 4. Configure Your Settings
Make the platform feel like home by customising it to match your company's brand.
- Company Details: Go to Company > Actions > Edit Company to update your details and choose your default language.
- Customise Templates: Tailor your experience by editing system emails, creating or editing phishing templates, and updating internal support contact to fit your needs.
- White-Labelling: Upload your company logo and theme colour under Settings. This will automatically apply across all dashboards, reports and user notifications.

Helpful guides:
Step 5. Complete the Technical Setup (Do Not Skip!)
- Whitelisting ( Do Not Skip )
Before launching any training sessions or phishing simulations, your IT team needs to whitelist our domains. This ensures our simulated phishing emails and system notifications land safely in your team's inboxes rather than getting blocked.
Share these guides with your IT team:
Note for IT: Whitelist Goldphish domains across all security layers and tools. This includes bypassing Anti-Spam, Anti-Virus, Malware Scanning, Link Rewriting/Sandboxing, and URL Defence tools.
- Set Up The Phish Reporter
A well-rounded security awareness strategy relies on two key parts: Training Sessions (Assignments keeping users up to date on threats and how to avoid them) and Testing (simulated phishing).
Clicks show you who fell for a test, but reports show you who is actively applying what they’ve learned. When a user reports a suspicious email, that’s the real behaviour change you want to see, and that’s where your true return on investment lies!
Share these guides with your IT team to get this set up.
Set up the Phish Reporter Service
Need more info? Check out our Phishing guides.
Step 6. Run a Quick Test
Before launching to the entire company, run a test simulation with 2–3 users to verify your technical setup.
Instructions for Test Users:
- Check for the email: Confirm receipt of the test email. If it's missing, check the spam folder (and verify your IT whitelisting).
- Interact: Open the email, click the link, and complete the Just-in-Time Training page.
- Report: Use the Microsoft Phish Reporter button (or your team's designated forwarding method, depending on how your IT team sets it up) to report the email.
Final Verification: Wait 5–10 minutes for data to sync, then check your admin dashboard. If the metrics reflect your test actions correctly, you’re ready to launch your annual security awareness programme! 🎉🚀
Step 7. Launch Your Baseline & First Training Session or Series
Establish a Baseline
- First, Phish Everyone: Send out an unannounced baseline phishing simulation. Don't worry, this isn't to catch people out! It simply gives you an honest look at your organisation's starting risk level.
- Next, the Quiz: Once the phishing simulation wraps up, deploy Cyber Readiness Quiz 1. This is a one-time assessment to measure your users' general security knowledge before formal training begins
Helpful guide: How to Launch a Baseline Test
Send an Internal Announcement
Send your team a quick email explaining why this matters and what to expect. It builds trust and boosts engagement right out of the gate.
Copy and paste our Pre-launch Email Templates to get everyone informed and ready to engage.
- Launch Your First Training Session or Series
Now, the fun part! Our training content is NCSC-accredited and updated quarterly to keep up with real-world threats.
What Happens Once Your First Training Session Goes Live?
- Existing users can sign in with their existing details.
- New users will receive a welcome email prompting them to set up their password.
- Automated Reminders: To save you time, the platform automatically sends out a gentle nudge during the month to anyone with incomplete training. You don't have to lift a finger!
*(Users can still access and complete their training even after the official session end date has passed).
Note: If you select Everyone or a Specific Department for a scheduled session or series, any new learners added while it is active or scheduled will be automatically enrolled. Learners will not be added to sessions or simulations that have already ended.
The Easiest Way to Handle New Learner Onboarding
We recommend setting up an induction training session scheduled to run over a longer period (e.g., 12 months) with the audience set to "Everyone". By doing this, whenever new hires join, they'll automatically be enrolled in the onboarding session and receive their training straight away!
Good Core Assignments To Include:
- Cyber Readiness Quiz: A quick way to capture your new learners' baseline knowledge.
- Core Modules: Cyber Threats, Passwords, Phishing, and Safe Web Browsing.
- Compliance Modules: GDPR, HIPAA, PCI DSS, etc. (whichever apply to your organisation).
- Role-Based Modules: Specific training for high-target departments like HR, Finance, or IT.

Step 8. Access Your Reports
Managers can generate and download progress and performance reports in two formats: PDF for a quick executive summary, or a CSV export for a deep data dive.
Download Reports From:
- Report Dashboard: You can access and download reports anytime directly from the Reports section.
- From"My Company" Dashboard: Perfect for reviewing a single session or simulation. Just select the session you want to review and click View Session or View Simulation for an overview or to pull a report.
Tips:
- Department Updates: Need to share progress with department heads without giving them full platform access? Download the report as a CSV, filter it by department, and shoot over the file.
- Targeted Nudges: Download a CSV report, filter progress by "Incomplete", and send a quick Email or Teams nudge to those specific people. Communication outside the platform works wonders for completion rates!
Need more info? Check out our guides:
Bonus. Grab Your Free Resources
We want to help you keep security visible, positive and top-of-mind all year round throughout your office. Go to our Public Portal under the Resources tab on our Website to download:
📅 12-month Comms Calendar
🖼️ Engaging Posters & Infographics for the office
✉️ "Cyber Tips" ready to drop into your internal newsletters
That’s it. Easy peasy! 🍋
Moving forward, simply keep training regularly (we recommend a steady drip-feed monthly or bi-monthly), communicate positively outside the platform, and celebrate high reporting and completion rates.
Check out What's New on the App in our Support Centre to see all the updates and features we have planned for the year ahead.🚀
If you ever get stuck or need some tailored help, we’ve got your back! Pop us a message via the in-app chatbot or drop us an email via support - we're happy to help! 😊